Here is an awesome Halloween project that is fast and User friendly! Holiday decorations can get so expensive. This project can cost you around ten dollars and you have the satisfaction of making it yourself! So Go for it!
Materials Needed:
Materials Needed:
- Letters B,O,O...(can be found at a Hobby Lobby, Michaels or most craft stores.)
- 3 Orange and 3 Black pieces of scrapbook paper(Prefferably some cute Halloween prints)
- Modge Podge
- Foam Application brushes
- Black Paint
- Sand Paper
- Misc black and Orange ribbons
- Scissors
- Box Cutter Blade or Crafters blade(seen in picture for step needed)

Once you have what you need you can get started!
Step #1
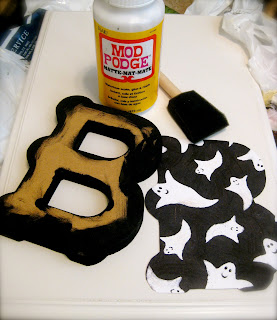
Take the letters and paint the inners and outers black. Go onto the surfaces just a little to hide if the paper isn't cut perfectly.( its not necessary to paint the entire surface since it will be covered). Move to step 2 fast while paint is still wet!


Step #2
Quickly place letter onto piece of desired paper to stamp the shape of the letter on it. This makes it alot easier to cut out and cut the back piece. (Don't worry about cutting centers. We will get to that later).


Step #3
After stamping the B and the O cut out one more "B" and 3 more "O"'s **Make sure to mirror the first cut out to make a total of 1 for each front and 1 for each back!**

Step #4
Font Sides. Get out that Modge Podge and your foam Brush. Apply enough to tack the paper and the letter together of the Modge Podge but not too much or it will make your paper bubble. After Applying paper use something with a even surface to press and slide toward letter edges to push out the excess adhesive from beneath the paper. I use the back of the Modge Podge Cap. Some use a Rolling Pin. (clean up excess modge podge) repeat for all front side surfaces.


Step #5
Once all are complete turn over and with blade cut out centers with one swift tracing cut. A sharp enough blade should give you a pretty clean cut but don't go to fast. If it catches it could tear paper.


Step #6
Once all the centers are cut out repeat step #4 and #5 for the backside!
Step #7
Almost Done! Just get some finishing done! Sand all the edges anywhere the paper edges meet the surface to give the paper a more "finished" look then add another coat of Modge Podge wait 20 min and add one more coat.

Step #8
EMBELLISH! I add a little ink to all the corners to antique a little and give a goulish ratty look! And take some random fun ribbons and tie around! You could also embellish with some bling if thats your style!


Whats awesome about this project is if you get sick of one combo of colors you can flip the letters around and have another! Please feel free to ask if you have any questions!
Enjoy!! Boo!!

Also try this project for other Holidays :
GIVE THANKS
MERRY CHRISTMAS
OR HO HO HO
LOVE
... the options are limitless!
This product is sold at our Open Houses!
GIVE THANKS
MERRY CHRISTMAS
OR HO HO HO
LOVE
... the options are limitless!
This product is sold at our Open Houses!


Hey, do you mind if I add this tutorial to my blog? I will link it to your site and actually just put the pic of BOO with materials needed on my blog post and then insert your blog address for them to click on in order to get the full tutorial. I'm still not ready to start doing my own tutorials right now and am just looking to post some fun stuff for now. Please let me know!!!
ReplyDeleteI love how customizable this Halloween decoration is!
ReplyDelete