Coming to a post box near you...

Stay Tuned for our next Give-a-way!!

Which would you rather have a gift for...

Baby or for Yourself?

Storm Room Easy Do

Lets be clear on this... Storm n. - a heavy fall of rain, snow, or hail, or a violent outbreak of thunder and lightning, unaccompanied by strong winds. Room n.- An area separated by walls or partitions from other similar parts of the structure or building in which it is located:
Storm Room
n.-
A room for all the kiddies to take off shoes, hang backpacks and place misc. objects after storming home from school, games, or other activities!

It feels like forever I have been waiting on a good deal on a bench, back hanger combo to create the little nook by our Garage door into a "Storm Room". But I cant seem to find any for a price I would dare to pay for them... hence this project!!

It was so long ago I found this picture So Im not sure who to give credit to... (if it's you please tell me and ill be glad to give it!)
Anyway I thought it was such a fabulous Idea!!

So I am going to share it with you!

All you need are three items :

  • A Shelf (bench and shelf need to be same length
  • A sheet of Beadboard (found at Lowes or Home Depot)
Paint them the color of your choice , assemble, train the kids and you will forever feel more organized, less stressed, and self accomplished for creating such a masterpiece! Happy Decorating!!

HuikiLau Bannana Pancakes... heavenly

Kids Eat these up!!!
While living in Hawaii... learned a few things. 
And I can tell you one of the best things I learned

Banana Pancakes.


Spending many mornings at the HukiLau Cafe I learned a whole new brand of breakfast and a whole new meaning to the word "PANCAKE"

So I got what they would give and mixed it with a little of my own!

and here is the result:

Banana Pancakes
(Can be doubled or so on...
this recipe makes about 10 pancakes!)

Ingredients
  • 1C flour
  • 3tsp Baking Powder
  • 1tsp Salt
  • 2 Eggs
  • 2-3 Bananas (depending on how much you like)
  • 1C Milk
  • 1T Oil

Step 1
Combine Flour, Baking Powder, and Salt in a mixing Bowl #1

Step 2
Separate 2 Eggs putting whites in one smaller bowl(#2) and yokes in bowl with dry ingredients(#1)

Step 3
In bowl #1 add milk , oil and One smashed up bannana
and beat til mixed evenly

Step 4
Beat whites till they are as fluffy as you think they can get...
and pour into Bowl #1

Step #5 
Do not Beat together!! 
Stir together till mixed sufficiently and begin to cook on griddle

Step #6
While cooking on first side take sliced banana pieces and place in mix then flip when ready! Sometimes they stick to surfaces so you may want to spray before you cook. 


Step #7 
FEAST!

*If your like my husband you load on some peanut butter... then your syrup!


*Or If your like me... I like to use Xagave Sugar Free Syrup that is sweeter than honey!
Love it! 

Hope you enjoy! Let me know how it works out!

Spark


Looking for a great fall accessory? check out Emily Sparks handmade crocheted work! Very unique, very cute, and very original!


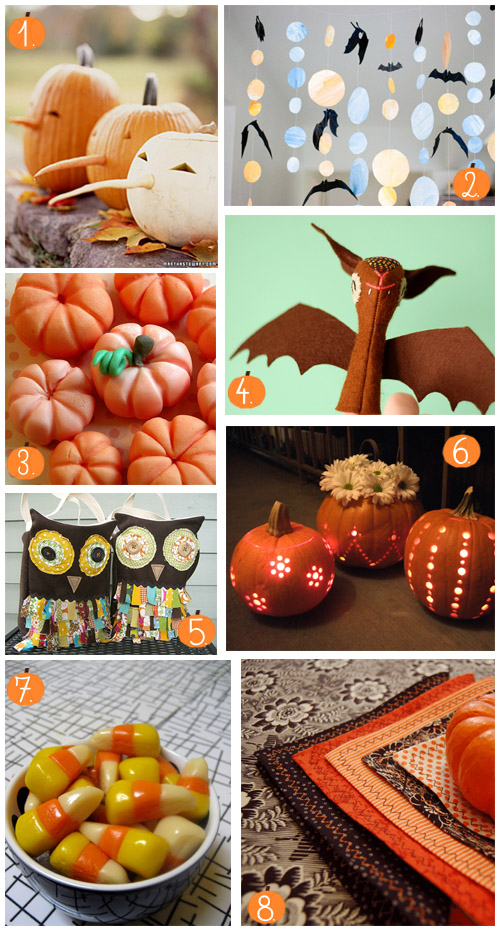
8 Killer Halloween How To's...

tuteshalloween.jpg
Its Fall Madness!
And we love it!
At First I thought I would do a variation of the cute owl's, but then I wanted to do the pumpkins, so I just thought I would give you the link and let you decide! So many to choose from and so cute! Get Crazy with it! And don't be 
afraid to add you own twist!! 

Its not to Late for that Garden!


I know we promised DIY... but I thought we should get to this first..

For those of you who haven't had time to get that Winter Garden in yet.
ITS NOT TOO LATE!! Infact im planting mine today!


Planting and keeping a garden we will agree isn't the easiest of jobs, but it all becomes worth it once you bite into that first tomato or carrot. And you can never go back to store bought foods!

A few tips for beginning Gardners
*Don't try and plant everything you want the first time! Many people plant everything they want and then become overwhelmed and let it go. Dont forget what it entails... watering weeding and caring. Start small and add crops over the years. 
*Dont let weeds stick around! The weeds suck nutrients from the plants and not only can hurt them but can hurt the flavor! Dont get behind. When you go out to check on them just pull the little boogers. Its worth it!
*The easiest garden to start is going to be a box garden. Build up a couple rows of bricks or logs and fill it with compost , and soil. This is the easiest because you dont have to do any digging. It is very organized and its astheticly pleasing :)
*Pay attention to where the sun is in the yard! Sun = Healthy

Other than that...  there are So many websites to let you know how to keep a garden in your side of the world! So be brave! Do it!

Here is a list of many of the Cool weather/Winter plants!

  • Snap peas and snow peas -Frost-hardy peas may be planted whenever the soil temperature is at least 45°F or plant heat-tolerant varieties in midsummer to late summer for a fall crop. Plant peas at least 1 to 1-1/2 inches deep and one inch apart. Approximately 60 days to harvest.
  • Cole crops: broccoli, cabbage, collards (frost hardy- can tolerate more cold weather in the late fall than other cole crops - 60-75 days to harvest), cauliflower, brussels sprouts, bok choy...
  • Carrots - Hardy, cool season biennial. Plant about 1/2 deep (no more than two or three seeds per inch). Takes 2 weeks to germinate and approximately 60+ days to mature.
  • Parsnips - Plant seeds 1/2 to 3/4 " deep. They are slow germinating. You can keep them in the ground over winter and harvest in spring for what most consider to be the best flavor!
  • Beets - Fairly frost hardy. Thin seedlings to 1-3 inches apart. Start successive plantings at 3 to 4 week intervals until midsummer. Takes approximately 60 days to maturity.
  • Onions - Winter onions are planted from sets formed at the tops of the plant in place of flowers. You must get a winter variety such as walking onion/Egyptian onion, and these are perennials so give them a permanent home. In August, plant the sets 1 inch deep. Space sets 4 inches apart.
  • Lettuce - Can be planted early spring or late summer. You may want to start lettuce seedlings in the shade and transplant when temperatures cool. Plant 1/2 inch deep, 12 inches apart.
  • Mesclun - A mixture of young, leafy greens including lettuce.
  • Spinach - Seed spinach in late summer for fall and winter harvest. Chill your spinach seeds in the refrigerator for 1-2 weeks before planting.
  • Rutabagas/Turnips - A rutabaga is a cross between a cabbage and turnip. Turnips grow wild in Siberia. Turnips mature in two months and may be planted either in the spring, late summer or fall. You can eat the roots or leaves. Rutabagas mature in 3 months.
  • Chard - Plant seeds 1/2 to 3/4 inches deep.

Also, remember that cold frames, containers, indoor gardening and greenhouses extend your growing season too. Many people garden year-round. Where there's a will, there is almost always "a way."


And the Winner is...

 The winner of the 2 tickets to the Midnight showing of 
New Moon

Congratulations to

Mysti Brown

We will be contacting you on how to redeem your prize!

Thank you to everyone who participated!!
Check back for a 
New give-away 
coming soon!
 

New Moon Tomorrow!


Check tomorrow for the winner of the New Moon Midnight ticket Giva-a-way!

And a great new DIY project!

Toodles!

Simple Sassy Wall Decor

You may have seen this before,
Here is a Simple project that is fun, and inexpensive to add some color to a room
!

Or you could even take your kids to pick out fabrics to make a set for their own room!


Start by shopping around at thrift stores or in your grandma's or mothers craft closet and collect a few different sizes of these hoops.
They should cost from aroun $.10 to $1 a piece!


Or you can just go to your closest fabric or craft store to pick up the hoops and fabric!

Once you have them. Just decide what Coordinating fun fabric combination you would like to put on your wall and start to cut out a litle larger than the circle so you can glue town the excess fabrics. Or just go crazy with it like the picture above! You can go completely modern or totally vintage based on the fabrics you pick to choose wisely!

(For those of you who have never seen hoops before, you just take the two pieces apart, put fabric over smaller hoop and slide larger around the smaller to tighten and hold fabric in place!)

Pick which color you want to paint the rings if you even want to at all. The room I used them for was brown so I thought it would look best brown to tie in!
Then I would suggest spray paint! Its the fastest and easiest!

Now its time to add the finishing touches. Put the fabric in your dried hoops and screw them together tight around fabric then hot glue the excess fabric down to the back of the hoops.(Not to the fabric, to the wood).
**Make sure before you glue that the fabric is pulled down tight!**
Then hang on your wall in a fun combination,


And your done! Now go have some fun and do it!

Check them Out Cont.


Scentsy Candles

Silver Dapple Jewelry Custom - Personalized - Handmade Jewelry

PhoenixRose Boutique Etsy Children's Hair bows for all occasions and holidays!

Heavens 2 Betsy Aprons Vintage style aprons with an Oh So Cute pattern! Uniquely made uniquely named!

Polka Dot Posh Etsy Children's Apparel & Accessories

Mind Over Batter Specialty Cakes and Desserts! Tasty cake pops for any occasions!

Double Blessings Goat Milk Products Discover the "Double Blessing" of our goat's milk Lotion and Soaps. Not only is it good for your skin, it smells so good, it's better than wearing perfume!

Stylish Stockings Etsy "Buy More SAVE More" - Unique Holiday Stockings to dress up any fireplace, wall, or room. Bring the Warmth of the holidays into your family room today! Also, decorative stuffed pumpkins!

Check them Out!

Pepperblossom hosted open house boutique the past 4 Saturdays
at our home location in Mesa.
We were lucky to work with a variety of vendors and products! We will be posting information so you can get ahold of these vendors for their awesome products!

Robyn Bontrager "the Queen of all things Creative"


Nie Nie... heard of her? We LoVe her blog!


For those of you who love reading inspirational posts, please check out NieNie Dialogues!
Her strength shines through every post! We love to read about her adventures! She is such a graceful women/wife/mother/person. She always links us to other great blogs, events, and even products! Be inspired and check her out!

Shabby Apple - Modest, Beautiful, Perfect!


Fit to Flatter

Were so excited to share Shabby Apple with you. We've always be an "Apple" stalker. If you don't know who or what Shabby Apple is....Well, then you're MISSING OUT!!!

Shabby Apple is an online dress boutique that has affordable, hip, attire perfect for work or a day to play. They are experts in modest women's dresses, little girls dresses, maternity dresses, and fashion accessories.


Our favorite part about Shabby Apple is the that they only design with modesty in mind. They create beautiful, flattering dresses without losing the modesty factor. The dresses are perfectly designed to fit just about every body type...making any woman feel and look great!


So you must go check out Shabby Apple and see what they're so good at. And because I'm sure you'll find something they've been gracious enough to offer a 10% discount to bloggers who get the code! Visit their page for that specific one!

  • Latest fashion line: Manhattan line, designed by Rebecca McKinney
  • New Fashion Line: Carousel Line is in! With Spring Line on its way!
  • Internship: Shabby Apple offers an internship, directed towards business, marketing, PR, fashion, etc, to inspire the chic, stylish local business mentality
  • They partnered with Unitus—a non-profit organization dedicated to accelerating access to financial services to the impoverished. Shabby Apple donates 5% of its net dress sales to support work in India helping women initiate businesses.
Here's something REALLY REALLY Cool that is going on... Shabby Apple is running a "Dare to Design" contest!
  • Design a dress
  • If you Win, the dress will be featured as part of the Shabby Apple Spring collection
  • The winner will receive a 3% royalty on EVERY dress sold of his or her design!!!!
This contest if open to EVERYONE...not just professionals! Go check it out!!!


BOO!! Block Letters


Here is an awesome Halloween project that is fast and User friendly! Holiday decorations can get so expensive. This project can cost you around ten dollars and you have the satisfaction of making it yourself! So Go for it!

Materials Needed:
  1. Letters B,O,O...(can be found at a Hobby Lobby, Michaels or most craft stores.)
  2. 3 Orange and 3 Black pieces of scrapbook paper(Prefferably some cute Halloween prints)
  3. Modge Podge
  4. Foam Application brushes
  5. Black Paint
  6. Sand Paper
  7. Misc black and Orange ribbons
  8. Scissors
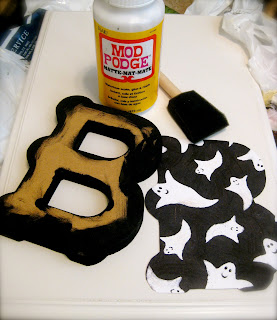
  9. Box Cutter Blade or Crafters blade(seen in picture for step needed)

Once you have what you need you can get started!

Step #1
Take the letters and paint the inners and outers black. Go onto the surfaces just a little to hide if the paper isn't cut perfectly.( its not necessary to paint the entire surface since it will be covered). Move to step 2 fast while paint is still wet!


Step #2
Quickly place letter onto piece of desired paper to stamp the shape of the letter on it. This makes it alot easier to cut out and cut the back piece. (Don't worry about cutting centers. We will get to that later).


Step #3
After stamping the B and the O cut out one more "B" and 3 more "O"'s **Make sure to mirror the first cut out to make a total of 1 for each front and 1 for each back!**


Step #4
Font Sides. Get out that Modge Podge and your foam Brush. Apply enough to tack the paper and the letter together of the Modge Podge but not too much or it will make your paper bubble. After Applying paper use something with a even surface to press and slide toward letter edges to push out the excess adhesive from beneath the paper. I use the back of the Modge Podge Cap. Some use a Rolling Pin. (clean up excess modge podge) repeat for all front side surfaces.


Step #5
Once all are complete turn over and with blade cut out centers with one swift tracing cut. A sharp enough blade should give you a pretty clean cut but don't go to fast. If it catches it could tear paper.


Step #6
Once all the centers are cut out repeat step #4 and #5 for the backside!

Step #7
Almost Done! Just get some finishing done! Sand all the edges anywhere the paper edges meet the surface to give the paper a more "finished" look then add another coat of Modge Podge wait 20 min and add one more coat.


Step #8
EMBELLISH! I add a little ink to all the corners to antique a little and give a goulish ratty look! And take some random fun ribbons and tie around! You could also embellish with some bling if thats your style!


Whats awesome about this project is if you get sick of one combo of colors you can flip the letters around and have another! Please feel free to ask if you have any questions!

Enjoy!! Boo!!


Also try this project for other Holidays :

GIVE THANKS
MERRY CHRISTMAS
OR HO HO HO
LOVE
... the options are limitless!

This product is sold at our Open Houses!

Featured Tomorrow! Dont Miss!

We LoVe our vendors!
not only do they provide quality products but each creation is unique and made from the heart!
Come Check them out Tomorrow (Saturday)
Oct 3rd from 8:30-3pm
Yours Truely products
&
Mind Over Batter
Scripture Cases by Karen
D-finative Creations
Clips by Mysti
"Ty-Dye For"
Designer Jeans and Clothing
Children's Accessories by Demie
Creativity for All
Poka Dot Posh
Spoiled Pink
Delectable Edibles
Banners by Mary
and much more!
Don't forget to enter to win midnight tickets to New Moon!
(you only can enter at our open house boutiques)

Vendor - Spotlight

Our friend Karen Lee makes the cutest scripture bags!

Her bags have been apart of our boutiques since we started!


You can find a variety of colors and patterns this Saturday!
These bags are well made and super functional!

This ones for all you Mom-preneurs out there!

Okay you awesome people making your own businesses. Now we all love Etsy and all those fabulous online shoppes! But are you ready to get serious about your passion? Are you ready to get your home crafting or any fun idea you have a shot at a real business!? 
This Company is Amazing
Usually when you want to have a web page it costs SO SO SO much dinero! Like a few Grand a year at minimum... and trust me I have done my research!! But not here

The Company is called - 


They design and help manage a personalized web page for you for just under $50 a month!
Yeah... and I know what your thinking..."No way"right? Seriously

That's It!!  This place is awesome and they make it so easy and Functional.
Our page is a work in progress as I speak and I don't think it could be any easier

Within two days of calling I had two Example pages that they had already worked up for me! Then after a nice phone call and some of our input in 1 more day the FINAL PRODUCT. That's 3 Days!! Quick, Easy, and Affordable. What else could you be looking for? There is an example of ours down a little bit! 

Go to their page by clicking HERE and watch the 2 min video on the home page. It explains everything. Promise its worth your time if you are seriously interested in getting a page!

It is so easy and honestly... if you can Blog, you can do this easy! Its basically the same tools to manage but so much more professional looking! 

So here is what ours will look like! What do you think?? Love?
Were so excited!
Now go get yours!


Here are just a few more examples!


By the way... all pages are copywrited....
so dont copy
It makes you fat
Plus its just not so cool.

Loves, Pepperblossom

Related Posts with Thumbnails

Hits to our page!